Discovering your trusty Roborock robot vacuum halted with a “Lidar Sensor Error” can be frustrating, turning a routine cleaning into a puzzling technical challenge. The Lidar (Light Detection and Ranging) sensor is the brain behind your robot’s navigation, allowing it to accurately map your home and maneuver efficiently. When this crucial component malfunctions, your robot vacuum can become disoriented, unable to clean effectively, or even start its cleaning cycle. This guide will walk you through common causes of the Lidar sensor error and provide actionable troubleshooting steps, from simple fixes to more advanced solutions, to get your Roborock back on track.
Understanding the Roborock Lidar Sensor and Its Importance
At the heart of your Roborock’s intelligent cleaning lies its Lidar sensor, typically housed within a spinning turret on top of the device. This sensor emits laser beams and measures the time it takes for them to reflect off objects and return. By rapidly scanning its surroundings, the Lidar system creates a precise, real-time map of your home, allowing the robot to identify walls, furniture, and obstacles. This mapping capability enables efficient navigation, systematic cleaning paths, and the creation of virtual boundaries. Without a functioning Lidar sensor, your Roborock loses its ability to “see” and map, resulting in errors that halt its operation.
Common Causes of the “Lidar Sensor Error”
A “Lidar Sensor Error” on your Roborock can stem from several issues, ranging from minor obstructions to more complex hardware problems. Understanding these causes is the first step toward a successful fix.
- Physical Obstructions: This is the most frequent culprit. Small objects like tangled hair, lint, dust, or even tiny pieces of debris can block the Lidar turret’s rotation or obscure the sensor’s view.
- Dirt and Dust Buildup: Over time, dust and grime can accumulate on the Lidar lens or within its housing, impairing its ability to accurately detect surroundings. [cite: 3 (from cleaning query)]
- Lidar Motor Issues: The Lidar sensor relies on a small motor to spin the turret. If this motor gets stuck, is faulty, or has a loose belt, the sensor won’t operate correctly, leading to an error. [cite: 1, 2, 4 (from motor query)]
- Software Glitches: Occasionally, a software bug or a minor firmware issue can cause the Lidar system to misreport its status, even if there’s no physical problem. [cite: 3 (from cleaning query), 1 (from Lidar error query)]
- Hardware Malfunction: Less commonly, the Lidar module itself or its internal connections might be faulty, requiring more advanced repair or replacement. [cite: 2, 4 (from motor query), 5 (from Lidar error query)]
Initial Troubleshooting Steps (Simple Fixes)
Before delving into more complex solutions, try these straightforward steps to resolve the Lidar sensor error. These often address the most common causes and can quickly restore your Roborock’s functionality.
1. Power Cycle Your Roborock
A simple restart can often clear temporary software glitches.
- Turn off your Roborock: Press and hold the power button until it shuts down.
- Wait: Give it a minute or two.
- Turn on: Press the power button again.
- Test: Attempt to start a cleaning cycle.
|
Our Picks for the Best Robot vacuum cleaner in 2026
As an Amazon Associate I earn from qualifying purchases.
|
||
| Num | Product | Action |
|---|---|---|
| 1 | SHELIKI Robot Vacuum and Mop Combo, 3-in-1 Robotic Vacuums Cleaner with 70-Day Self-Emptying Base, LiDAR Navigation Smart Mapping & Strong 6000Pa Suction, for Pet Hair, Hard Floor, Carpet |

|
| 2 | roborock Q7 M5+ Robot Vacuum and Mop, Upgraded from Q5 Max+, Up to 7-9 Weeks Self-Empty, 10000Pa Suction, Dual Anti-Tangle System for Pet Hair & Carpet, PreciSense LiDAR Navigation, App Control, Black |
|
| 3 | ILIFE V2 Robot Vacuum Cleaner, Tangle-Free Suction, 120 Mins Runtime, Slim, Self-Charging Robotic Vacuum Cleaner, Ideal for Pet Hair and Hard Floors |
|
| 4 | Robot Vacuum and Mop Combo, 2 in 1 Robot Vacuum Cleaner with WiFi/App, Smart Robotic Vacuums with Strong Suction, Schedule, Self-Charging, Slim, Quiet, Ideal for Hard Floor, Pet Hair, Low Pile Carpet |
|
| 5 | Shark Matrix Clean | Robot Vacuum Cleaner with Powerful Suction for Pet Hair, Rugs, Carpets & Hard Floors | Self-Empty Base | 60-Day Capacity | Voice Control | LiDAR Navigation | Cool Grey | AV2511AE |
|
| 6 | Robot Vacuum and Mop, Mapping Robotic Vacuums Cleaner with LiDAR Navigation Smart & Strong Suction, WiFi/App/Alexa/Voice Control, Obstacle Avoidance, for Home, Wood/Hard Floors, Pet Hair -Gray |
|
| 7 | roborock Qrevo Series Robot Vacuum and Mop, 8000Pa Suction, Upgraded from Qrevo S, Anti-Tangle Brushes, Smart Obstacle Avoidance, Auto Mop Washing, All-in-One Dock, 200RPM Spinning Mops, Black(QV 35A) |
|
| 8 | Tikom Robot Vacuum and Mop, 6000Pa Robotic Vacuum Cleaner with Self-Emptying Base, 90 Days Capacity, LiDAR Navigation, Home Mapping, Ideal for Pet Hair, Hard Floors, Carpet (L8000 Plus) |
|
| 9 | eufy Robot Vacuum 11S MAX, Super Thin, Powerful Suction, Quiet, Self-Charging Robotic Vacuum Cleaner, Cleans Hard Floors to Medium-Pile Carpets, Black |
|
| 10 | Tikom Robot Vacuum and Mop Combo, 5000Pa Robotic Vacuum Cleaner, 150 Min Max, App & Remote Control, Ideal for Hard Floor, Carpet, Pet Hair, Self-Charge(G8000 Max) |
|
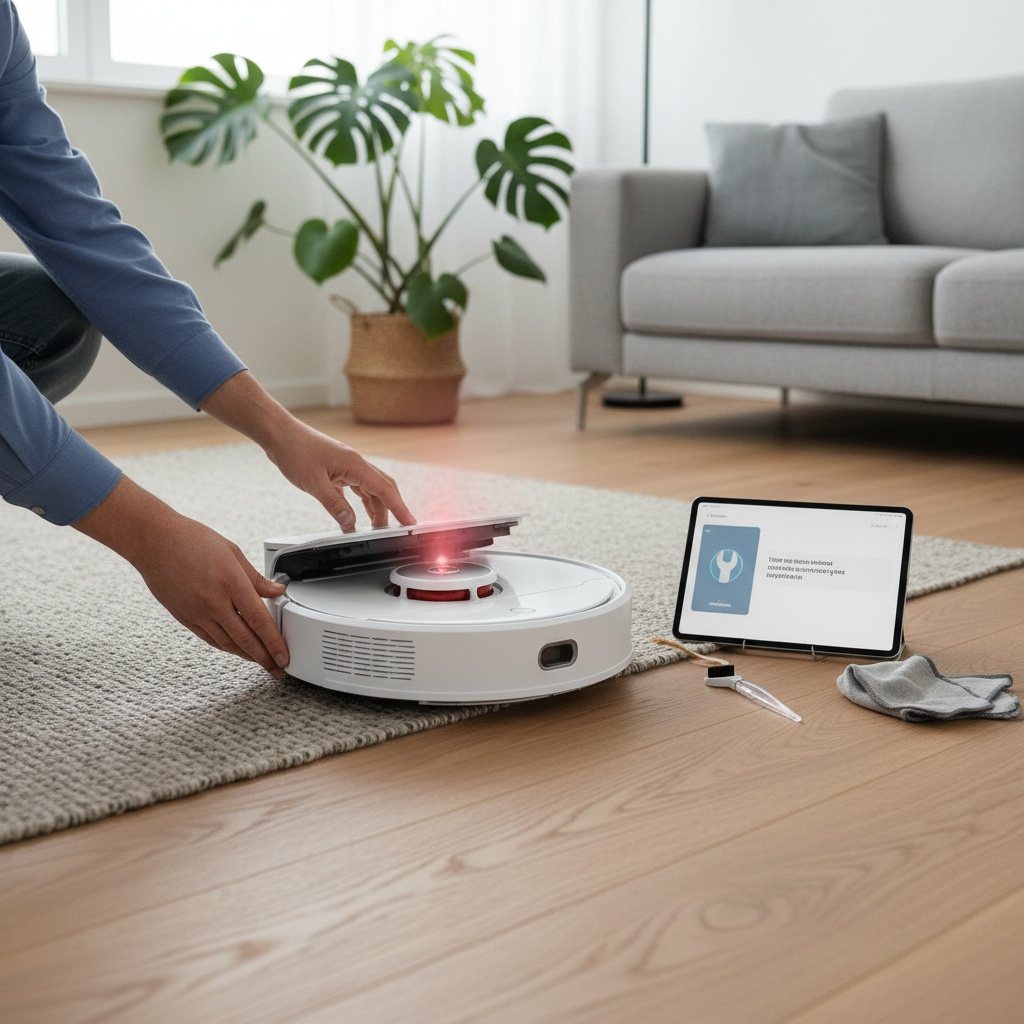
2. Check for Physical Obstructions
Carefully inspect the Lidar turret for anything that might be blocking its movement.
- Visual Inspection: Look for tangled hair, small toys, fabric, or any foreign objects around the Lidar dome on top of your Roborock.
- Clear the Area: Gently remove any visible obstructions. Ensure nothing is pressing down on the turret from above.
3. Clean the Lidar Sensor and Dome
Dust and dirt are common enemies of sensors. Regular cleaning is vital.
- Use a Soft, Dry Cloth: Power off your Roborock. Gently wipe down the Lidar dome and the sensor window (if visible) with a soft, lint-free cloth. [cite: 1 (from cleaning query)]
- For Stubborn Debris: Some users have found success gently holding a Q-tip with 91% isopropyl alcohol against the spinning Lidar sensor while the robot attempts to clean. This can dislodge tiny, unseen debris causing friction.
- Canned Air: A quick burst of canned air can help dislodge dust from hard-to-reach crevices around the turret.
4. Manually Spin the Lidar Motor
If the turret isn’t spinning freely, it might be stuck.
- Gently Rotate: Power on your Roborock and attempt to start a cleaning cycle. If the Lidar turret doesn’t spin, gently try to rotate it manually with your finger. [cite: 3 (from motor query)]
- Repeat if Necessary: Sometimes, multiple gentle rotations can help free a sticky motor.
Advanced Troubleshooting and Potential Solutions
If the initial steps haven’t resolved the “Lidar Sensor Error,” consider these more in-depth solutions. These often tackle software issues or indicate a need for component inspection or replacement.
1. Factory Reset Your Roborock
A factory reset can revert your robot’s software to its original state, eliminating persistent glitches. Be aware that this will erase maps and settings, so you’ll need to set up your Roborock again. The process usually involves holding a combination of buttons on the robot (refer to your specific model’s manual for exact instructions). [cite: 1 (from Lidar error query)]
2. Update Firmware
Ensure your Roborock’s firmware is up to date through the Roborock app. Software updates often include bug fixes and performance improvements that could address sensor issues. While one user noted a firmware update didn’t fix their specific error, it’s still a recommended step. [cite: 1 (from Lidar error query), 3 (from cleaning query)]
3. Check for Lidar Motor Issues (Disassembly May Be Required)
If the Lidar motor is not spinning or making unusual noises, it might be faulty or have a dislodged belt. This step requires some technical comfort as it involves partially disassembling your Roborock.
- Access the Lidar Module: You may need to remove the top cover of your robot to access the Lidar module. Look for screws around the perimeter or under rubber stoppers.
- Inspect the Motor and Belt: Check if the small rubber belt connecting the motor to the spinning Lidar component is intact and properly aligned. Hair or debris can sometimes tangle around the motor itself. [cite: 5 (from Lidar error query)]
- Reconnect the Lidar Module Connector: Some users have resolved issues by disconnecting and reconnecting the PCB connector for the Lidar unit, effectively “resetting” it. This can be a surprisingly effective fix for software-related issues without obvious physical obstructions. [cite: 5 (from Lidar error query)]
4. Consider Replacing the Lidar Module or Motor
If troubleshooting points to a hardware failure with the Lidar motor or the entire module, replacement might be necessary. This is typically a last resort for out-of-warranty devices.
- Lidar Motor: Individual replacement motors are available online and can be a cost-effective solution if only the motor is faulty. [cite: 2, 4 (from motor query)]
- Lidar Module: If cleaning and motor replacement don’t work, replacing the entire Lidar module might be the only option. These parts can also be found online. [cite: 5 (from Lidar error query)] Many videos are available online to guide you through the disassembly and replacement process.
When to Contact Roborock Support
If you’ve exhausted all troubleshooting options and the “Lidar Sensor Error” persists, it’s time to reach out to Roborock customer support. This is especially true if:
- Your Roborock is still under warranty. Attempting complex repairs yourself might void the warranty.
- You are uncomfortable with disassembling your robot.
- The issue seems to be a complex internal hardware failure.
Roborock’s support team can provide further diagnostics, repair options, or guide you through a warranty claim. [cite: 3, 4 (from motor query)]
Preventive Measures to Avoid Lidar Sensor Errors
Maintaining your Roborock proactively can significantly reduce the likelihood of encountering a Lidar sensor error.
- Regular Cleaning: Make it a habit to regularly wipe down the Lidar dome and other sensors with a soft, dry cloth.
- Clear the Environment: Before running your robot, quickly scan the floor for potential obstructions like loose wires, small toys, or excessive hair that could get caught in the Lidar turret.
- Timely Firmware Updates: Keep your Roborock’s software updated to benefit from the latest improvements and bug fixes.
“A well-maintained robot vacuum is a happy robot vacuum. Simple, consistent cleaning of external sensors can prevent a majority of navigation errors.” – ReviewEvoli Admin, Robot Vacuum Expert
Conclusion
A “Lidar Sensor Error” on your Roborock can be a temporary setback, but with a systematic approach to troubleshooting, you can often resolve the issue yourself. From ensuring no physical obstructions are present and thoroughly cleaning the sensor to performing restarts or factory resets, many solutions are within your reach. While some issues might require replacing a component or contacting customer support, the satisfaction of restoring your robot vacuum to perfect working order is truly rewarding. Keep your Roborock’s Lidar sensor clean and clear, and it will continue to provide you with effortless, intelligent cleaning.
What’s the most unusual item you’ve found blocking your robot vacuum’s sensors?
Frequently Asked Questions
What does “Lidar Sensor Error” mean on a Roborock?
The “Lidar Sensor Error” indicates that your Roborock’s primary navigation sensor, located in the spinning turret on top, is not functioning correctly. This prevents the robot from accurately mapping its surroundings and moving efficiently, often halting its cleaning cycle.
How do I clean my Roborock Lidar sensor?
To clean your Roborock Lidar sensor, first power off the robot. Then, use a soft, dry, lint-free cloth to gently wipe the Lidar dome and any visible sensor windows. For stubborn debris, a Q-tip with a small amount of isopropyl alcohol can be used cautiously.
Can a firmware update fix a Lidar sensor error?
Yes, sometimes a firmware update can resolve a Lidar sensor error if the issue is software-related. Ensure your Roborock’s app and robot firmware are up to date, as updates often include bug fixes and performance enhancements that might address sensor malfunctions.
What if my Roborock Lidar turret is not spinning?
If your Roborock Lidar turret isn’t spinning, first ensure there are no physical obstructions like hair or debris. Try gently rotating it manually to free any stickiness. If the problem persists after cleaning and restarting, the Lidar motor might be faulty or its belt dislodged, potentially requiring replacement.
When should I replace the Lidar motor or module?
Consider replacing the Lidar motor or the entire module if you’ve exhausted all other troubleshooting steps, including cleaning, restarting, factory resetting, and checking for obstructions, and the error persists. This is typically a solution for devices out of warranty, as professional repair or warranty service is advisable otherwise.