In the modern smart home, robot vacuums have become indispensable tools, tirelessly maintaining floors with minimal intervention. However, there are often areas you want your robotic helper to avoid—be it a delicate antique, a pet’s food bowl, or even a cluttered workspace. This is where “no-go zones” come into play, transforming your robot vacuum from a general cleaner into a precision-guided assistant. Mastering the art of setting these boundaries can significantly enhance your cleaning routine, ensuring both efficiency and peace of mind.
What are Robot Vacuum No-Go Zones?
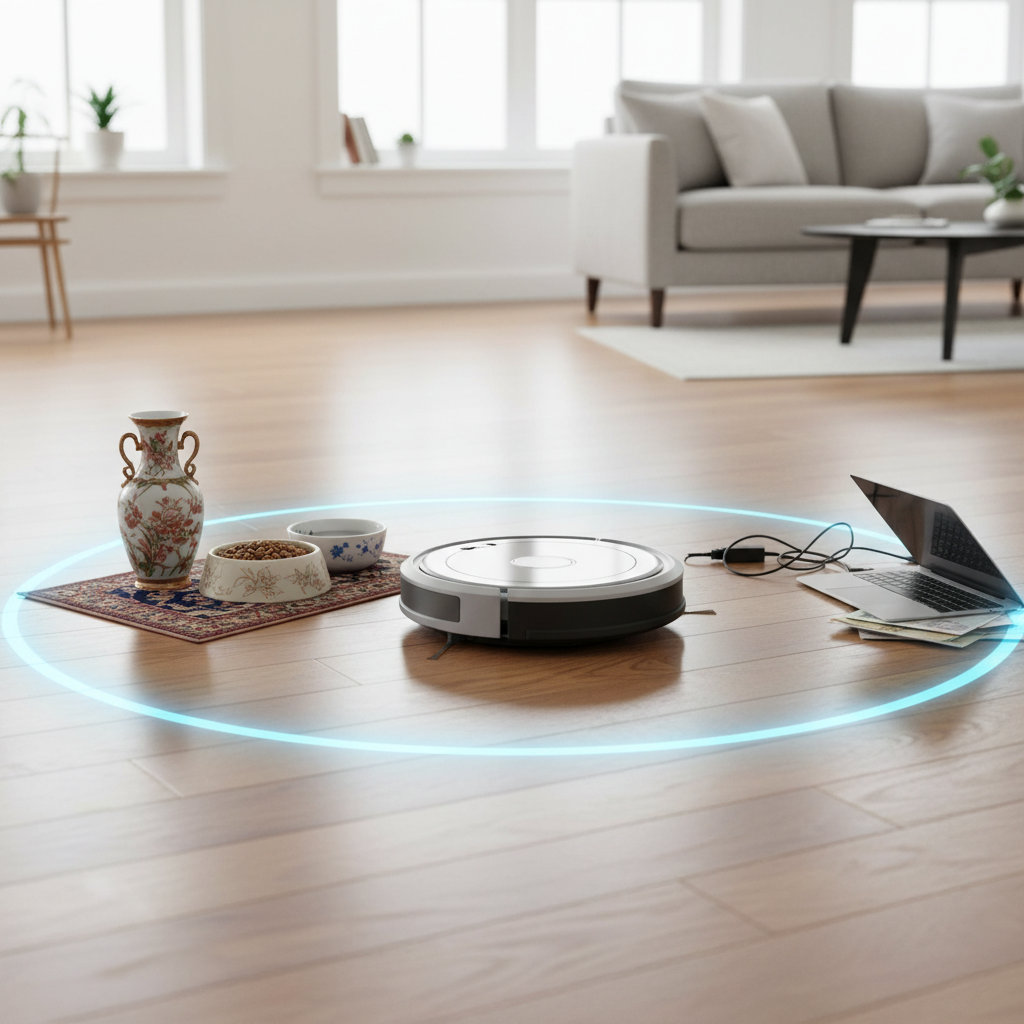
Robot vacuum no-go zones are designated areas within your home that you instruct your robot vacuum to avoid during its cleaning cycles. Think of them as invisible fences or exclusion zones. Their primary purpose is to prevent your robot from entering specific spaces where it might get stuck, damage items, or simply isn’t needed. These intelligent boundaries are crucial for optimizing your cleaning experience, safeguarding your belongings, and ensuring your robot operates smoothly without constant supervision.
Types of Robot Vacuum No-Go Zones
Robot vacuums utilize various methods to establish these forbidden areas, largely depending on their navigation technology. Understanding these types will help you determine the best approach for your specific model and home environment.
1. App-Controlled Virtual Boundaries
Modern robot vacuums equipped with advanced mapping technology, such as LiDAR or camera-based systems, primarily rely on companion smartphone applications to create virtual boundaries. This method offers unparalleled precision and flexibility.
- Explanation: After your robot vacuum completes its initial mapping of your home, a detailed floor plan is displayed in its dedicated app. Within this app, you can digitally draw rectangular or linear “no-go zones” directly onto the map. The robot then stores these virtual barriers and uses its navigation system to strictly avoid them in subsequent cleaning sessions. Many high-end models also offer “no-mop zones,” allowing the robot to vacuum but not mop certain areas, like carpets.
- Benefits: This method is highly precise, completely customizable, and requires no physical clutter on your floor. You can adjust zones with ease from anywhere, and they are invisible to the eye, preserving your home’s aesthetic.
- How to Set Up (General Steps):
- Ensure Map Creation: Your robot must first successfully map your home. This often involves an initial exploratory cleaning run.
- Launch App: Open your robot vacuum’s companion app (e.g., iRobot Home, ECOVACS HOME, eufy Clean, Roborock, etc.).
- Access Map: Navigate to the map management or editing section within the app.
- Select No-Go Zone Feature: Look for an icon or option labeled “No-Go Zone,” “Virtual Wall,” “Keep Out Zone,” or “Boundary.”
- Draw Zones: Use your finger to draw the desired exclusion areas (usually red rectangles or lines) directly on the virtual map. You can often resize and reposition these zones.
- Save Settings: Confirm and save your new no-go zones. The robot will now respect these boundaries during its cleaning tasks.
|
Our Picks for the Best Robot vacuum cleaner in 2026
As an Amazon Associate I earn from qualifying purchases.
|
||
| Num | Product | Action |
|---|---|---|
| 1 | Tikom Robot Vacuum and Mop Combo, 5000Pa Robotic Vacuum Cleaner, 150 Min Max, App & Remote Control, Ideal for Hard Floor, Carpet, Pet Hair, Self-Charge(G8000 Max) |

|
| 2 | ILIFE V2 Robot Vacuum Cleaner, Tangle-Free Suction, 120 Mins Runtime, Slim, Self-Charging Robotic Vacuum Cleaner, Ideal for Pet Hair and Hard Floors |
|
| 3 | SHELIKI Robot Vacuum and Mop Combo, 3-in-1 Robotic Vacuums Cleaner with 70-Day Self-Emptying Base, LiDAR Navigation Smart Mapping & Strong 6000Pa Suction, for Pet Hair, Hard Floor, Carpet |
|
| 4 | Robot Vacuum and Mop, Mapping Robotic Vacuums Cleaner with LiDAR Navigation Smart & Strong Suction, WiFi/App/Alexa/Voice Control, Obstacle Avoidance, for Home, Wood/Hard Floors, Pet Hair -Gray |
|
| 5 | roborock Q7 M5+ Robot Vacuum and Mop, Upgraded from Q5 Max+, Up to 7-9 Weeks Self-Empty, 10000Pa Suction, Dual Anti-Tangle System for Pet Hair & Carpet, PreciSense LiDAR Navigation, App Control, Black |
|
| 6 | eufy Robot Vacuum 11S MAX, Super Thin, Powerful Suction, Quiet, Self-Charging Robotic Vacuum Cleaner, Cleans Hard Floors to Medium-Pile Carpets, Black |
|
| 7 | Tikom Robot Vacuum and Mop, 6000Pa Robotic Vacuum Cleaner with Self-Emptying Base, 90 Days Capacity, LiDAR Navigation, Home Mapping, Ideal for Pet Hair, Hard Floors, Carpet (L8000 Plus) |
|
| 8 | Shark Matrix Clean | Robot Vacuum Cleaner with Powerful Suction for Pet Hair, Rugs, Carpets & Hard Floors | Self-Empty Base | 60-Day Capacity | Voice Control | LiDAR Navigation | Cool Grey | AV2511AE |
|
| 9 | Robot Vacuum and Mop Combo, 2 in 1 Robot Vacuum Cleaner with WiFi/App, Smart Robotic Vacuums with Strong Suction, Schedule, Self-Charging, Slim, Quiet, Ideal for Hard Floor, Pet Hair, Low Pile Carpet |
|
| 10 | roborock Qrevo Series Robot Vacuum and Mop, 8000Pa Suction, Upgraded from Qrevo S, Anti-Tangle Brushes, Smart Obstacle Avoidance, Auto Mop Washing, All-in-One Dock, 200RPM Spinning Mops, Black(QV 35A) |
|
2. Physical Magnetic Strips/Boundary Tapes
For some robot vacuums, especially older models or those without advanced app-based mapping, physical magnetic strips or boundary tapes are the solution.
- Explanation: These are actual strips of magnetic tape that you lay directly on the floor. Robots equipped with magnetic field sensors detect these strips, signaling them to stop and change direction. The tape acts as a physical indicator that the robot should not cross.
- Benefits: Magnetic strips are straightforward to use, require no Wi-Fi or app for operation, and are effective for robots compatible with this technology. They are a reliable, low-tech solution for creating consistent barriers.
- How to Set Up:
- Check Compatibility: Verify that your robot vacuum has magnetic field sensors designed to recognize boundary tapes.
- Strategic Placement: Place the magnetic strips directly on the floor to cordon off areas. Common uses include doorways, around pet bowls, or in front of delicate furniture.
- Considerations: Ensure the tape has sufficient magnetic strength, height, and width (typically at least two centimeters wide and three millimeters high) for your robot to detect it reliably. For optimal adherence, use an easily removable adhesive if you need to secure the strips.
3. Physical Barriers
While less “smart,” physical barriers remain a simple and effective way to prevent your robot vacuum from entering certain areas.
- Explanation: This involves using everyday objects like baby gates, strategically placed furniture, or even closed doors to block off spaces.
- Benefits: They are universally applicable to all robot vacuums, require no special technology, and can be quickly deployed or removed as needed.
Why You Need No-Go Zones: Key Benefits
Implementing no-go zones offers numerous advantages, transforming your robot vacuum from a helpful gadget into an even more intelligent and reliable cleaning partner.
- Protect Delicate Items and Furniture: Prevents your robot from bumping into fragile vases, antique furniture, or areas with intricate decor, avoiding potential damage.
- Prevent Tangles with Cables and Loose Items: Cords, phone chargers, shoelaces, and small toys are common culprits for robot vacuums getting stuck. No-go zones keep your robot away from these entanglement hazards.
- Keep Pet Areas Clean and Undisturbed: Designate zones around pet food and water bowls, or litter boxes, to prevent your robot from spreading messes or disturbing your furry friends.
- Avoid Sensitive Zones: Keep the robot out of nurseries during nap time, home offices during important calls, or bedrooms when you prefer silence, without disrupting your overall cleaning schedule.
- Prevent Falls (Stairs): While most modern robots have cliff sensors, no-go zones provide an extra layer of security, especially if you have an older model or particularly steep staircases.
- Optimize Cleaning Routes and Preserve Battery Life: By restricting the robot to necessary cleaning areas, it can clean more efficiently, cover active zones more thoroughly, and conserve battery power.
- Protect Specific Floor Types: For robot vacuums with mopping functions, “no-mop zones” are vital to prevent wetting carpets or rugs, ensuring they are only vacuumed. Similarly, no-go zones can protect highly polished or delicate flooring that might require specialized cleaning.
Step-by-Step Guide: Setting Up Virtual No-Go Zones (App-Based)
For mapping robot vacuums, the app is your command center. Follow these general steps to establish virtual no-go zones:
- Initial Mapping Run: If you haven’t already, allow your robot vacuum to complete a full mapping run of your home. This creates the digital floor plan you’ll use. Ensure doors to all areas you want mapped are open.
- Open Your Robot’s App: Launch the dedicated application on your smartphone or tablet.
- Access the Map: Navigate to the “Map” or “Map Management” section. You should see a visual representation of your home’s layout.
- Select No-Go Zone Tool: Look for an icon that typically resembles a “no entry” sign, a square with a line through it, or an option explicitly labeled “No-Go Zone” or “Virtual Wall.”
- Draw the Zone: Tap and drag on the map to draw a rectangular or linear area where you want the robot to avoid. You can usually adjust the size, shape, and orientation of this zone.
- Repeat for Multiple Zones: Add as many no-go zones as needed to cover all restricted areas.
- Save Your Changes: Crucially, tap the “Save” or “Confirm” button. Without saving, your changes will not be applied.
- Test Cleaning: Initiate a cleaning cycle to verify that your robot respects the newly established boundaries.
Step-by-Step Guide: Using Physical Magnetic Strips
If your robot vacuum uses magnetic strips, the setup is more tactile:
- Acquire Compatible Strips: Purchase magnetic boundary strips specifically designed for robot vacuums. Check your robot’s manual for recommendations.
- Identify Restricted Areas: Walk through your home and pinpoint all areas where the robot should not go (e.g., a specific room’s entrance, around a floor-standing lamp, a pet zone).
- Place the Strips: Lay the magnetic tape directly on the floor to create the desired barrier. Ensure the strip is straight and covers the full width of the entrance or perimeter you wish to block.
- Secure (Optional): If the strips tend to move, you might secure them with double-sided tape, ensuring the adhesive is safe for your flooring and easily removable.
- Test: Run your robot vacuum and observe its behavior when it approaches the magnetic strip. It should detect the barrier and turn around.
Common Challenges and Troubleshooting
Even with careful setup, you might encounter issues with your robot vacuum’s no-go zones. Here are some common problems and solutions:
- Robot Ignores No-Go Zones:
- Clean Sensors: Dust, dirt, or debris on the robot’s sensors (cliff sensors, navigation sensors, or magnetic field sensors) can impair its ability to detect boundaries. Give them a thorough cleaning.
- Remap Your Home: If the virtual map is corrupted or inaccurate, your robot might lose its spatial awareness. Delete the old map from the app and perform a new mapping run.
- Firmware and App Updates: Ensure both your robot’s firmware and the companion app are updated to the latest versions. Bugs in older software can cause zone recognition failures.
- Wi-Fi Connection (for App-Based): A weak or unstable Wi-Fi connection can prevent the robot from receiving updated map data or boundary instructions from the app.
- Magnetic Strip Issues: For physical strips, ensure they are compatible with your robot, laid correctly, and have sufficient magnetic strength. Very thick carpets can also weaken the magnetic field of strips laid underneath.
- False “Destination Blocked by No-Go Zones” Alert: If you receive this alert even when no no-go zones are set, it might indicate corrupted map data. A full remap of your home is usually the solution.
- Robot Gets Stuck in Unexpected Areas: This might mean your no-go zones aren’t comprehensive enough. Re-evaluate the areas it gets stuck in and expand or add new zones as necessary.
- Initial Mapping Failures: No-go zones rely on an accurate map. If your robot struggles to map your home (due to clutter, poor lighting for camera-based robots, or lifted during mapping), address these underlying issues first.
Choosing the Right No-Go Zone Method for Your Robot Vacuum
The best no-go zone method depends on your robot vacuum’s capabilities and your personal preferences:
- For Advanced Mapping Robots (LiDAR/Camera): App-controlled virtual boundaries are almost always the superior choice due to their precision, flexibility, and invisibility.
- For Older or Basic Models: Physical magnetic strips are your go-to solution. They are reliable and don’t require smart mapping features.
- Consider Your Home: If you have dynamic areas that frequently change (e.g., a child’s play area that moves), app-based zones are easier to adjust. For static obstacles or permanent room dividers, either method can work.
- Budget: Robots with advanced app-based no-go zones typically come at a higher price point than basic models relying on magnetic strips.
Conclusion
Setting up no-go zones for your robot vacuum is a fundamental step in optimizing its performance and integrating it seamlessly into your smart home. Whether you opt for the digital precision of app-controlled virtual boundaries or the straightforward reliability of physical magnetic strips, these defined exclusion zones protect your valuables, prevent frustrating jams, and allow your robot to clean more intelligently and efficiently. By understanding the options and applying these simple setup and troubleshooting tips, you empower your robot vacuum to work smarter, not just harder, ensuring your floors stay pristine without unwanted intrusions.
Ready to take control of your robot’s cleaning path? Which method will you choose to make your robot vacuum a more precise and protective cleaning companion?
Câu Hỏi Thường Gặp
Can all robot vacuums have no-go zones?
Not all robot vacuums have no-go zone capabilities. Basic “bump and go” models typically lack this feature, while more advanced robot vacuums with mapping technology (LiDAR or camera-based) offer app-controlled virtual boundaries. Some older or mid-range models might use physical magnetic strips.
What’s the difference between no-go zones and no-mop zones?
No-go zones prevent the robot vacuum from entering an area for any cleaning activity (both vacuuming and mopping). No-mop zones, available on some two-in-one models, specifically prevent the robot from mopping in a designated area (like a carpet), but still allow it to vacuum that space.
How wide should a magnetic strip for a robot vacuum be?
For optimal detection by the robot vacuum’s sensors, magnetic boundary strips should typically be at least two centimeters (approximately 0.8 inches) wide and at least three millimeters (approximately 0.12 inches) high. Thicker and wider strips often create a stronger magnetic field, making them more reliably detectable.
My robot ignores no-go zones, what should I do?
First, ensure your robot’s sensors are clean. For app-based zones, check your Wi-Fi connection, update the app and robot firmware, and consider deleting and re-mapping your home. For magnetic strips, verify they are correctly placed, compatible with your robot, and that their magnetic field is strong enough.