The rhythmic whir of a robot vacuum brings unparalleled convenience to modern homes, making daily cleaning effortless. But what happens when one of its most crucial components—the side brush—falters, leaving corners untouched and dirt lingering? A broken side brush motor can halt your robot’s efficient dance across your floors, turning a smart appliance into a frustrating paperweight. This comprehensive guide will walk you through the process of diagnosing, troubleshooting, and performing a DIY repair on your robot vacuum’s side brush motor, helping you restore its cleaning prowess without a costly trip to the repair shop.
Robot Vacuum Cleaner: A Comprehensive Guide
What is a Robot Vacuum Cleaner?
|
Our Picks for the Best Robot vacuum cleaner in 2026
As an Amazon Associate I earn from qualifying purchases.
|
||
| Num | Product | Action |
|---|---|---|
| 1 | eufy Robot Vacuum 11S MAX, Super Thin, Powerful Suction, Quiet, Self-Charging Robotic Vacuum Cleaner, Cleans Hard Floors to Medium-Pile Carpets, Black |

|
| 2 | roborock Q7 M5+ Robot Vacuum and Mop, Upgraded from Q5 Max+, Up to 7-9 Weeks Self-Empty, 10000Pa Suction, Dual Anti-Tangle System for Pet Hair & Carpet, PreciSense LiDAR Navigation, App Control, Black |
|
| 3 | Robot Vacuum and Mop, Mapping Robotic Vacuums Cleaner with LiDAR Navigation Smart & Strong Suction, WiFi/App/Alexa/Voice Control, Obstacle Avoidance, for Home, Wood/Hard Floors, Pet Hair -Gray |
|
| 4 | ILIFE V2 Robot Vacuum Cleaner, Tangle-Free Suction, 120 Mins Runtime, Slim, Self-Charging Robotic Vacuum Cleaner, Ideal for Pet Hair and Hard Floors |
|
| 5 | Shark Matrix Clean | Robot Vacuum Cleaner with Powerful Suction for Pet Hair, Rugs, Carpets & Hard Floors | Self-Empty Base | 60-Day Capacity | Voice Control | LiDAR Navigation | Cool Grey | AV2511AE |
|
| 6 | Tikom Robot Vacuum and Mop Combo, 5000Pa Robotic Vacuum Cleaner, 150 Min Max, App & Remote Control, Ideal for Hard Floor, Carpet, Pet Hair, Self-Charge(G8000 Max) |
|
| 7 | roborock Qrevo Series Robot Vacuum and Mop, 8000Pa Suction, Upgraded from Qrevo S, Anti-Tangle Brushes, Smart Obstacle Avoidance, Auto Mop Washing, All-in-One Dock, 200RPM Spinning Mops, Black(QV 35A) |
|
| 8 | Tikom Robot Vacuum and Mop, 6000Pa Robotic Vacuum Cleaner with Self-Emptying Base, 90 Days Capacity, LiDAR Navigation, Home Mapping, Ideal for Pet Hair, Hard Floors, Carpet (L8000 Plus) |
|
| 9 | Robot Vacuum and Mop Combo, 2 in 1 Robot Vacuum Cleaner with WiFi/App, Smart Robotic Vacuums with Strong Suction, Schedule, Self-Charging, Slim, Quiet, Ideal for Hard Floor, Pet Hair, Low Pile Carpet |
|
| 10 | SHELIKI Robot Vacuum and Mop Combo, 3-in-1 Robotic Vacuums Cleaner with 70-Day Self-Emptying Base, LiDAR Navigation Smart Mapping & Strong 6000Pa Suction, for Pet Hair, Hard Floor, Carpet |
|
A robot vacuum cleaner is an autonomous device designed to clean floors with minimal human intervention. Equipped with sensors, mapping technology, and various cleaning mechanisms, these devices navigate homes, picking up dust, dirt, and debris. They typically feature main brushes or suction inlets for general cleaning and smaller, spinning “side brushes” that extend to sweep debris from edges and corners into the main cleaning path. The evolution of robot vacuums has seen advancements from simple bump-and-go models to sophisticated mapping robots with app control, self-emptying docks, and even mopping capabilities, making them indispensable allies in maintaining a clean home.
Benefits of Using a Robot Vacuum Cleaner
The advantages of integrating a robot vacuum into your home are numerous, extending beyond just cleanliness. Primarily, they offer significant time and effort savings, handling daily upkeep autonomously. Their ability to clean automatically and continuously means your floors can always be presentable, even when you’re not home. Robot vacuums are suitable for various floor types and spaces, from hardwood and tile to low-pile carpets, adapting their cleaning modes as needed. Furthermore, by capturing dust and allergens, they contribute to an improved indoor air quality, beneficial for allergy sufferers and pet owners alike.
Important Features to Consider
When investing in a robot vacuum cleaner, several key features dictate its performance and suitability for your home.
- Floor Type: Ensure compatibility with your specific floors, whether carpet, hardwood, or tile.
- House Size: Consider battery life and mapping capabilities for small, medium, or large areas.
- Battery Life: Adequate run-time is crucial to complete cleaning cycles without needing frequent recharges.
- Navigation System: Advanced systems like Lidar (laser), camera, or bumper sensors enhance efficiency and obstacle avoidance.
- Connectivity: Wi-Fi and app control allow for scheduling, zone cleaning, and remote operation.
- Suction Power: Measured in Pascals (Pa), a higher rating indicates better ability to pick up debris and pet hair.
- Filtration: HEPA filters are essential for capturing fine dust and allergens, promoting healthier air.
- Special Features: Look for auto-recharge, virtual walls, and specific area cleaning modes for added convenience.
Understanding Your Robot Vacuum’s Side Brush
The side brush on your robot vacuum is a critical component for thorough cleaning, especially along walls and in corners where the main brushes cannot reach. It spins rapidly, sweeping debris into the vacuum’s primary suction path. When this brush stops working, your robot leaves behind noticeable streaks of dirt, defeating its purpose.
Common Reasons for Side Brush Motor Failure
Several factors can lead to a side brush motor failing:
- Hair and Debris Entanglement: This is the most common culprit. Long hair, pet fur, threads, and other debris can tightly wrap around the brush spindle and into the motor housing, causing excessive friction and eventually burning out the motor or stripping its gears.
- Motor Wear and Tear: Like any mechanical component, the small electric motor powering the side brush has a finite lifespan. Over time, constant use can lead to internal wear, reducing its efficiency or causing complete failure.
- Gear Damage: The side brush motor often drives a small set of gears. These plastic gears can become stripped or cracked due to obstructions, impacts, or simply age, leading to a grinding noise or the brush not spinning.
- Impact Damage: Collisions with furniture or walls, especially at high speeds, can sometimes jar the motor or its wiring loose, or even physically damage the brush assembly.
- Electrical Issues: Less common, but a faulty connection, a broken wire, or an issue with the robot’s main circuit board could prevent power from reaching the side brush motor.
Signs of a Broken Side Brush Motor
Identifying a broken side brush motor is usually straightforward:
- Side Brush Not Spinning: The most obvious sign is when the side brush remains stationary during a cleaning cycle.
- Slow or Intermittent Spinning: The brush might spin sluggishly or stop and start, indicating a struggling motor or partial obstruction.
- Grinding or Clicking Noises: Unusual sounds coming from the side brush area, especially a grinding or clicking, often point to stripped gears or an internal motor issue.
- Ineffective Edge Cleaning: If your robot is leaving dirt along edges and in corners, its side brush is likely not performing its job.
Before You Begin: Safety First & Troubleshooting
Before attempting any repair, prioritize safety and rule out simpler issues.
Safety Precautions
- Power Off and Unplug: Always turn off your robot vacuum and disconnect it from its charging dock or power outlet.
- Remove Battery: For most robot vacuums, it’s crucial to remove the battery to completely cut power before beginning disassembly.
- Use Proper Tools: A small Phillips head screwdriver is typically sufficient. Some models might require a flat-head or a specialized tool.
- Work in a Clean, Well-Lit Area: This helps prevent losing small screws and ensures you can clearly see the components.
Basic Troubleshooting Steps
Sometimes, the issue isn’t a broken motor but a simple obstruction.
- Inspect the Brush Visually: Carefully examine the side brush for any visible hair, string, or debris wrapped around its base or stem.
- Clean the Brush and Housing: Gently pull off the side brush (most are held by a single screw or clip) and thoroughly clean the brush and the area underneath it. Use scissors to cut away tangled hair.
- Restart the Robot: After cleaning, reattach the brush, reinstall the battery, and restart your robot vacuum. Run a short cleaning cycle to see if the issue is resolved.
If these basic steps don’t fix the problem, it’s time to delve deeper into the motor repair.
Tools You’ll Need
- Small Phillips head screwdriver
- (Possibly) A flat-head screwdriver or coin (for battery compartments/brush screws)
- Tweezers or needle-nose pliers (for removing tangled hair)
- A small container for screws (to avoid losing them)
- A new side brush motor module or replacement gears (if required)
- (Optional) Multimeter (for advanced diagnostics)
- (Optional) Lubricant for gears (silicone-based, safe for plastics)
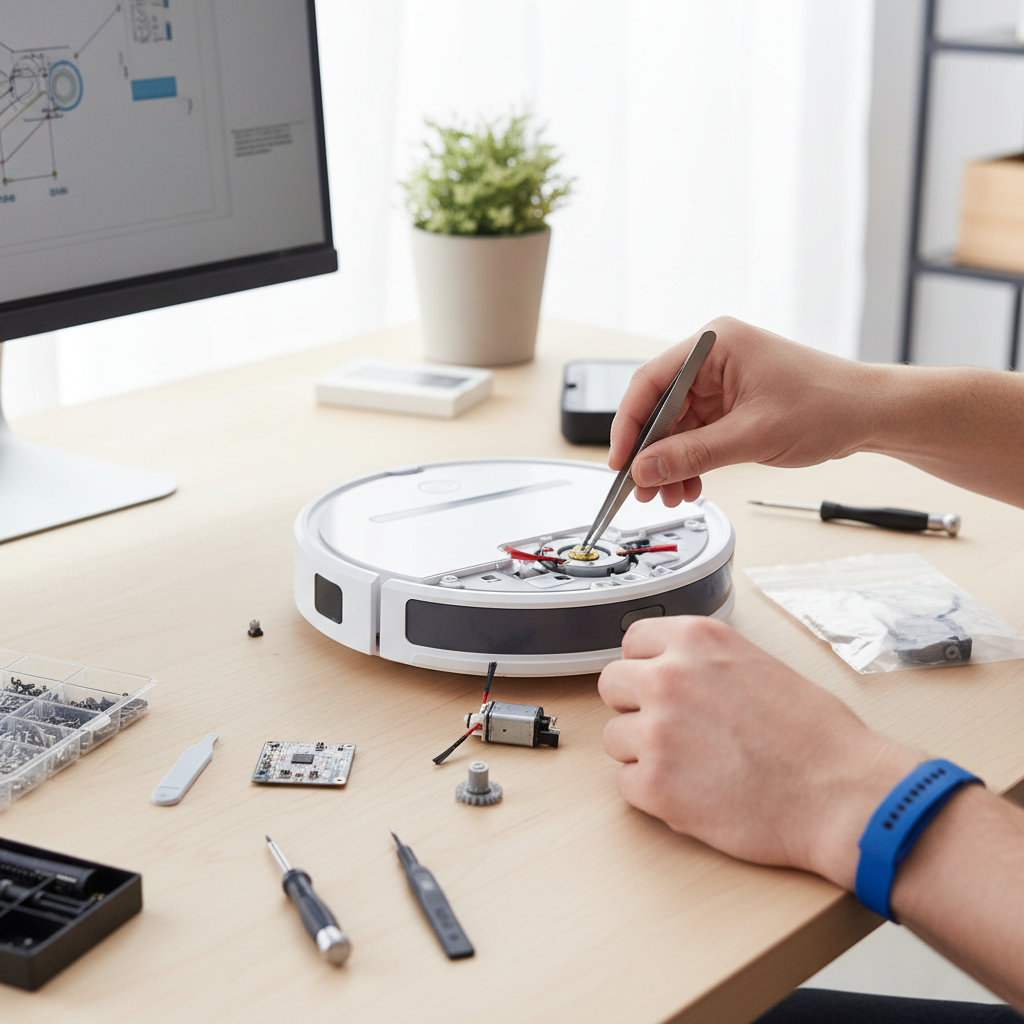
Step-by-Step DIY Side Brush Motor Repair Guide
This general guide covers the typical steps involved. Specific models may vary, so consult your robot vacuum’s manual or online repair videos for your exact model if available.
Step 1: Disassembly
- Remove the Side Brush: Use your Phillips head screwdriver (or a coin for some models like Roomba) to unscrew the center screw holding the side brush. Carefully lift off the brush.
- Remove the Bottom Cover: Flip your robot vacuum over. You’ll typically find several Phillips head screws holding the bottom cover in place. Unscrew all of them and carefully remove the cover. Keep track of the screws, as some might be longer than others.
- Remove the Battery (If Applicable): In many models, the battery is located under the bottom cover. There might be a battery door secured by one or two screws. Remove these, disconnect the battery connector, and lift out the battery.
- Locate the Side Brush Motor Module: With the bottom cover removed, you should be able to see the internal components. The side brush motor is usually housed in a distinct module, often near where the side brush attaches. It’s usually a small, rectangular or square box with wires leading to it.
Step 2: Inspect and Diagnose
- Disconnect the Motor Module: The side brush motor module is typically held in place by two or three small screws and connected by a small wire harness. Unscrew the module and carefully disconnect the wire harness from the main board.
- Examine for Obstructions: Once the module is free, look closely at the gears and the motor shaft for any hidden hair, dirt, or debris that might be causing friction. Use tweezers to carefully remove any tangles.
- Inspect Gears: If your model allows access to the gears (sometimes the module can be pried open), check for stripped teeth, cracks, or excessive wear. This is a common failure point, especially if you heard grinding noises.
- Test the Motor (Advanced): If you have a multimeter, you can test the motor’s continuity or try applying a small voltage (e.g., from a 1.5V AA battery) directly to the motor leads to see if it spins. Proceed with caution if unfamiliar with electronics.
Step 3: Repair or Replacement
Based on your diagnosis, you have a few options:
- Clean and Reassemble (If Only Obstructed): If you found significant obstructions and the motor otherwise seems fine, thoroughly clean the module, apply a small amount of plastic-safe lubricant to the gears (if accessible), and reassemble.
- Replace the Entire Side Brush Module: This is the most common and often easiest DIY repair. If the motor is dead or the gears are irrevocably damaged, purchasing a new, complete side brush module is usually the best approach. Simply install the new module, reconnect its wiring harness, and secure it with screws.
- Replace Just the Motor/Gears (More Advanced): Some dedicated DIYers might opt to replace only the tiny motor or the internal gears if these parts are separately available for their specific model. This requires careful disassembly of the module itself and precise reassembly. Ensure the new motor or gears match the original specifications.
Step 4: Reassembly
- Install the New/Repaired Module: Secure the side brush motor module (new or repaired) back into its position with the screws you removed earlier. Reconnect its wire harness to the main board, ensuring a firm connection.
- Reinstall the Battery: If you removed the battery, reconnect its plug to the main board and place it back in its compartment. Secure the battery door if applicable.
- Replace the Bottom Cover: Carefully align the bottom cover and secure it with all the screws. Do not overtighten.
- Reattach the Side Brush: Place the side brush back onto its post and secure it with its center screw.
- Test Your Robot: Place your robot vacuum back on its charging dock to ensure it powers on correctly. Then, initiate a short cleaning cycle to verify that the side brush spins freely and operates as expected.
Comparing Robot Vacuum Cleaner Price Segments
Understanding the different price segments can help you set realistic expectations for features and repairability.
Budget-Friendly Segment (Under $200)
- Pros: Highly affordable, good entry point for basic automated cleaning, simple operation.
- Cons: Often lack advanced navigation (rely on bump-and-go), lower suction power, shorter battery life, minimal smart features, parts can be harder to find or more expensive relative to the unit’s cost.
- Best for: Small apartments, homes with minimal pet hair, users new to robot vacuums who need basic cleaning.
Mid-Range Segment ($200 – $500)
- Pros: Improved navigation (some mapping), stronger suction, longer battery life, basic app control, often include virtual boundaries. Better build quality and easier access to common replacement parts.
- Cons: May still lack advanced obstacle avoidance, mapping can be less precise than premium models.
- Best for: Medium-sized homes, users seeking a balance of features and affordability, pet owners with moderate shedding.
Premium Segment (Over $500)
- Pros: State-of-the-art navigation (Lidar, AI-powered), powerful suction, self-emptying docks, advanced app features (zone cleaning, no-go zones), mopping capabilities, superior obstacle avoidance, durable construction. Parts are generally readily available from the manufacturer.
- Cons: High initial investment, complex features might be overwhelming for some.
- Best for: Large homes, multi-level homes, users demanding the latest technology, those with specific cleaning needs (e.g., frequent pet messes, deep carpets).
Top Robot Vacuum Cleaners Highly Recommended Today
While this article focuses on repair, knowing some top models can give context to the types of robot vacuums homeowners are investing in.
1. iRobot Roomba j7+
- Features: PrecisionVision Navigation, P.O.O.P. (Pet Owner Official Promise) guarantee, self-emptying Clean Base, smart mapping.
- Pros: Excellent at avoiding pet waste and cords, powerful suction, reliable navigation.
- Cons: Higher price point, no mopping function.
- Ideal for: Pet owners and those who want a truly hands-off vacuuming experience without worrying about small obstacles.
2. Roborock S8 Pro Ultra
- Features: DuoRoller Riser brush system, VibraRise 2.0 mopping, RockDock Ultra (auto-empty, auto-fill, auto-clean mop), Reactive 3D Obstacle Avoidance.
- Pros: Combines top-tier vacuuming and mopping, comprehensive docking station, superb navigation.
- Cons: Very expensive, large docking station footprint.
- Ideal for: Users who want the ultimate all-in-one cleaning solution for both vacuuming and mopping.
3. Eufy RoboVac 11S MAX
- Features: Super-slim design, BoostIQ Technology, 2000Pa suction power, quiet operation.
- Pros: Affordable, very quiet, effective on hard floors and low-pile carpets, fits under most furniture.
- Cons: No smart mapping, uses random navigation, no app control.
- Ideal for: Budget-conscious buyers or smaller homes needing basic, effective vacuuming.
Detailed Comparison Table: Popular Robot Vacuum Cleaners
| Feature | iRobot Roomba j7+ | Roborock S8 Pro Ultra | Eufy RoboVac 11S MAX |
|---|---|---|---|
| Price Segment | Premium | Premium | Budget |
| Floor Types | Hardwood, Tile, Carpet (all) | Hardwood, Tile, Carpet (all) | Hardwood, Tile, Low-Pile Carpet |
| House Size | Medium to Large | Large | Small to Medium |
| Battery Life | ~75-90 minutes (recharges & resumes) | ~180 minutes (vacuum only) | ~100 minutes |
| Navigation System | PrecisionVision (camera-based) | Lidar + Reactive 3D Obstacle Avoidance | Random (Bump-and-Go) |
| Suction Power | Excellent (Multi-stage system) | Very High (8000Pa) | High (2000Pa) |
| Filtration | High-Efficiency Filter | E11 Rated Washable Filter | Triple Filter System |
| Special Features | P.O.O.P. Guarantee, Self-Emptying Dock | Auto-Empty, Auto-Fill, Auto-Clean Mop | Slim Design, Quiet Operation |
| Pros | Smart obstacle avoidance, pet-friendly | Superior all-in-one cleaning (vac & mop) | Affordable, quiet, fits under furniture |
| Cons | No mopping, high cost | Very expensive, large dock | No smart mapping, random cleaning |
Guide to Purchasing a Robot Vacuum Cleaner
Choosing the right robot vacuum requires careful consideration to ensure it meets your specific needs.
- Determine Your Needs: Start by evaluating your home’s layout, floor types, common debris (e.g., pet hair), and budget. Do you need smart mapping for specific rooms, or is basic cleaning sufficient?
- Research Features and Specifications: Dive into the details. Compare suction power, battery life, navigation technology, and filter types. Understand how different features translate into real-world performance.
- Read Reviews and Product Comparisons: Consult independent reviews and comparison articles from reputable sources. Pay attention to user experiences regarding reliability, ease of use, and long-term performance.
- Purchase from Reputable Retailers: Buy from authorized dealers or major e-commerce platforms with good return policies. This ensures you receive a genuine product and have recourse if issues arise.
- Inspect the Product Before Payment: If buying in person, quickly check the packaging for signs of tampering and ensure all advertised accessories are included.
“A well-maintained robot vacuum can be an incredible asset, but understanding its components, like the side brush motor, empowers owners to handle minor repairs and extend its lifespan significantly.” – ReviewEvoli Admin, Robot Vacuum Expert
Conclusion
A broken side brush motor doesn’t have to spell the end for your beloved robot vacuum. With a methodical approach to diagnosis and the right tools, a DIY repair is often well within reach. By understanding common failure points, performing basic troubleshooting, and following a step-by-step repair guide, you can restore your robot’s full cleaning potential. Regular maintenance, such as consistently cleaning the side brushes, can also significantly prolong the life of your motor and prevent future issues. Empower yourself with these repair skills and keep your home effortlessly clean.
What’s the most challenging robot vacuum repair you’ve tackled, or what feature would make DIY repairs even easier for you?
Frequently Asked Questions
Why is my robot vacuum’s side brush not spinning?
The most common reasons for a robot vacuum’s side brush not spinning include hair or debris entangled around the brush spindle or inside the motor housing, a faulty side brush motor, or damaged internal gears. Less frequently, it could be a loose wire or a main circuit board issue. Always start by thoroughly cleaning the brush area.
Can I replace the side brush motor myself?
Yes, in most robot vacuum models, replacing the side brush motor or the entire side brush module is a straightforward DIY repair. It typically involves removing the side brush, bottom cover, and a few screws to access and replace the faulty component. Specific steps may vary by model, so consulting your robot’s manual or online guides is recommended.
What tools do I need to fix a robot vacuum?
For most basic robot vacuum repairs, including side brush motor replacement, you will primarily need a small Phillips head screwdriver. A flat-head screwdriver, tweezers, or needle-nose pliers can also be helpful for removing tangled debris or disconnecting small parts. Always ensure you have a clean, well-lit workspace to keep track of small screws.
How often should I clean my robot vacuum’s side brushes?
It’s recommended to visually inspect and clean your robot vacuum’s side brushes after every few cleaning cycles, or at least once a week, especially if you have pets or long-haired occupants. Regular cleaning prevents hair and debris from building up and causing strain on the motor, extending its lifespan and maintaining optimal cleaning performance.
Is it worth repairing an old robot vacuum?
Whether repairing an old robot vacuum is worthwhile depends on the cost of the replacement part, the age and overall condition of the unit, and the price of a new robot vacuum. If the repair is simple and inexpensive (like a side brush motor), it’s often a good investment. However, for older, lower-end models with multiple failing components, purchasing a new, more efficient model might be a better long-term solution.